For the Coram Boy poster, I was initially given minimum specifications. The poster was to be made in A3, and include the motifs contained in the play, such as the idea of an angel.
Here is a transcript of some of my preliminary client contact, including ideas for the design.
HC: What I was thinking was to use some images we took of Karina and Adrian, which I can send you. Actually, I think we have them on a hard drive, and you can just go through them and pick out the ones you like. What we were thinking of was to do something with Karina’s eyes, possibly with the image of an angel, something like a stone angel statue.
BC: Do you have any other specifications for the design? Like the style, or the color?
HC: Not particularly, I’ll let you decide that. Really the only thing that we want in the poster is the themes of the play, so the idea of the angel, the concept of reality and illusion, poverty and wealth, just all the things that the play represents. You’re in the play, so I’m sure you understand these better than anybody.
BC: When does this need to be done?
HC: Well it would be great if you could make an initial design by the end of the week. It doesn’t have to be completely finalized, but it would be good if we could just get something to see how it might shape up.
My first thought was to make a few separate posters, each showcasing a character and a setting, but all containing the same visual style and imagery as to unify them. Each poster would contain a silhouette of a character at the bottom and the angel at the top of the poster, with a setting as the background.
I was involved in the play, so had knowledge of the main characters and the ideas associated with those characters. I chose to create 3 designs for 3 characters: Meshak, Aaron, and Alexander.
I drew out the 3 concepts on paper to get an idea of the look of the poster.
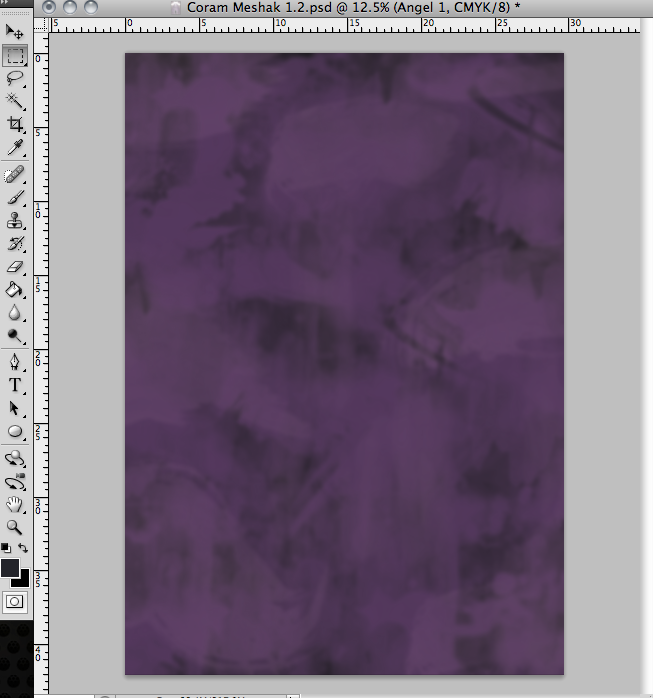
The first one is of Meshak, and will be made with a gloomy/ eerie dark purple background, created to emphasize shadow. Trees will also wrap around the sides to fit the setting of the woods.
The second image is of Aaron drowning. A blue wash for background, abstract/ iconic images and shapes used to create the underwater setting.
The final design is of Alexander. The background will be yellow and use the stage arches to show his wealthy background, and there will be images such as sheets of paper and musical notes.
I never actually got around to making this third design, as I only had time to make 2 before showing the client, and then the idea was abandoned. The third one was already the least developed even in planning, so it was probably a good idea that I did not spend more time trying to problem solve the idea.
After the initial design, I began to create the images needed for the poster. My photoshop skills were generally alright, but there were definitely skills that I needed to develop in order to create the design.
I broke the design down into its constituent parts:
- Angel
- Silhouette
- Background
I began making the wings of the angel, trying to make each feather structure separately and doing the design in more of an iconic style.
I used the freehand lasso tool to draw out the shape of the feather, then filled it in with color using a pre-existing brush which I downloaded online.
I actually tried out a few methods of filling the feathers, like several brushes of varying opacity and a solid color fill. In retrospect, it might have been a good idea to try a less opaque, more wispy look to contrast the solid look of the shadow, or even done the same look for the silhouette.

I then used the scale and Transform > Warp tool to change the dimensions of the feather. I copied the feather, changed the dimensions and angle, and repeated the process until I had a full wing. I duplicated the layers to create another wing to go on top to make a double layered design. To blend the two wing parts, I used the eraser tool to erase the border area between the two.
I had the options of using the other transform tools, like skew, distort, perspective, etc. However, I am not too sure exactly the difference between these tools, so I chose not to use them. Perhaps this is something I could explore in the future.

For the body of the angel, I sort of cheated and used an image off the internet as a template, as I did not have the artistic skill to draw the body by hand or make it from scratch. I traced around the area I wanted using the magnetic lasso tool and filled it in with color just to get a sort of template.
A few weeks after making this design, I created a poster for personal uses which was hand-drawn from scratch and traced around in illustrator using the pen tool. This could have been a viable way to create the design, but at the time I did not believe that I had the skills to execute it. Also, it would have taken a long time, time which would have been wasted.

I then selected the white template with the magic want tool, and used a combination of brushes to fill in the selected area. I copied in the wings which I made previously and resized them to fit the body.
Given that I had already filled the area in with white, I could have used a layer mask and brushes to achieve the reverse effect. Not sure if this would have worked though.

To make the poster background, I used the brushes, laying them on top of each other to create a background. After the wash was created, I used the polygonal lasso to draw out an area that looked like a tree. Doing the same thing I did with the angel, I filled in the area with different brushes and colors. I made a few versions of the trees, and copied them to get a full border.


I then put in a silhouette of a boy, done the same way as the angel, tracing around an existing image. Afterwards, the image of the angel was put in.
As mentioned above, I could have explored the possibility of not using an opaque fill for the boy, doing a brush fill similar to the angel.

All that was missing at this point was the atmosphere of the poster, and to create that I made new layers and used the brush tool to draw on certain areas in black or white for shadows or highlights respectively. I then set the opacity very low and repeated the process, creating about 8 or 9 lighting layers. There are probably better ways out there to do this, although this method is the one I am the most used to. This may be an area of research in future. Finally, I applied brightness/contrast and hue/saturation adjustment layers on top of the image to change the colors.
The final product is below, although it does not include text. I also repeated the process and used similar techniques to create the underwater poster.


Looking back at these, I am actually rather impressed at how they turned out, given the relative simplicity of the techniques used. Although I agree that the art style does not really fit the purpose, it still sort of works as a standalone poster.
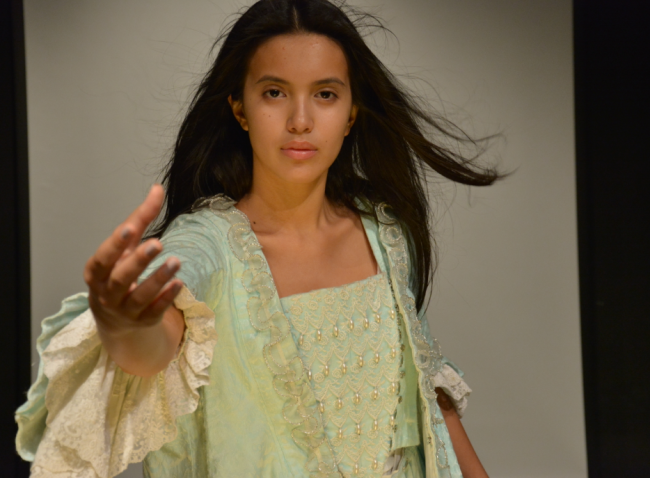
I spoke again with the client, and they said that the design was too modern to fit the theme of the play. This time, they were quite specific with the request. They gave me images to use of one of the main characters as well as a backdrop of the woods to use as the background of the poster. They requested that I use the image and increase the shadows and contrast to convey the darker more ominous side of the angel character. The background was to be blurred and turned red, so as not to clash with the color of previous poster designs.
These are some of the original images.

I was actually given many more images and ideas, like editing the image of a stone angel statue and superimposing eyes onto the image. I chose not to include these however, as they were absolutely terrible.
This required quite a bit of learning on my part to make, as although I knew how to use photoshop I did not have very much experience with working with photographs, and I knew that I would struggle with doing things with the image and keeping it realistic looking.
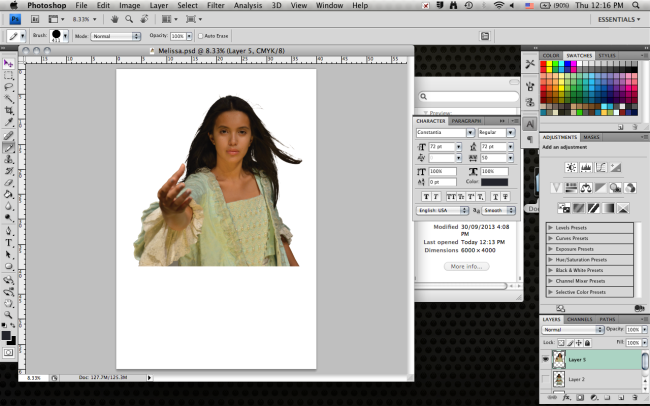
To begin, I needed to extract the image of the girl from the background. I usually use things like the lasso to do simple extractions, but I did not know how to do the detail of the hair, so I looked online to find other methods. I found multiple tutorials on how to use channels to extract hair.
http://www.youtube.com/watch?v=2P54l0nP4GY
http://www.photoshopcafe.com/tutorials/masking/masking.htm
I applied the technique to extract the image from the background. It involved duplicating a channel and using whatever methods to increase the contrast between black and white. Then the desired area is filled in with black and the unwanted part is painted white, leaving a clear distinction between the two. I command-clicked on the layer to make a selection (a skill useful in the future) and copied this into the new image or file.
I have found this to consistently be a very effective and useful technique, and if I had known it sooner I could have used it for other things, like the original angel in the first design.

I made a new file in a landscape A3 size, and started with the background made from the image of the trees and arches. It was quite easy to make, and simply involved applying a gaussian blur on the image and putting low-opacity layers of shadow over the top of it.
Basically all these techniques were used to degrade the original image, since its quality was rather poor, as it was a very small, close-up shot. If I had more time, I could have put more effort perhaps into creating a new background, or asking someone else for help making a background under this theme.


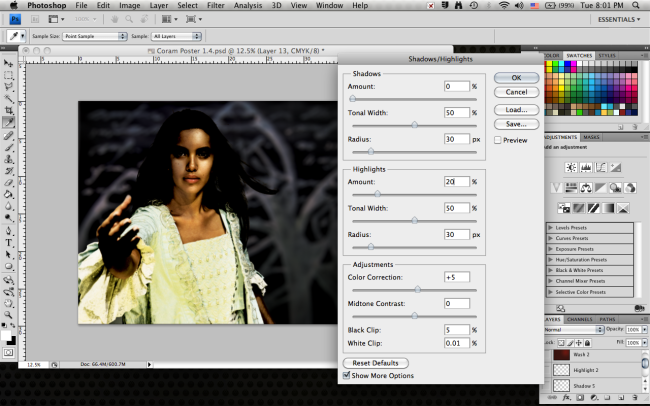
The next step was to increase the contrast and add shadows to one side of the image. I just increased the overall contrast using brightness and contrast and levels adjustment. Then looking over the adjustments bar I saw the shadows/highlights option, which I had never really used before. It seemed useful for the situation, so I experimented with it for a while, but never really understood the sliders as the labels did not make much sense to me.
I searched it up and found a few helpful explanations, then applied the effect.
http://helpx.adobe.com/photoshop/using/adjust-shadow-highlight-detail.html
http://www.dummies.com/how-to/content/fixing-exposure-with-shadowhighlight-in-photoshop-.html
http://www.photoshopessentials.com/photo-editing/shadow-highlight/
After doing this I needed to add shadows to one side of the face. The only way I really knew how to do this was manually, using new layers and the brush tool. I also knew how to use the burn and dodge tools, but I felt that these methods would not really be enough and there would be better ways out there.
A few tutorials on the shadow effect:
http://www.photoshopgurus.com/forum/general-photoshop-board/22181-how-create-face-shadow.html
http://www.ozzu.com/digital-art-forum/how-make-shadow-with-photoshop-t24360.html
http://www.digitalimagemagazine.com/blog/featured/photoshop-tutorial-add-dramatic-lighting-to-portraits/
This shows the shadow effect done with brushes. The effect is very controlled and can be altered easily, but the smooth look of the brushes makes it look less realistic and gives it more of the ‘flawless unblemished skin’ look, which is not necessarily either positive or negative.

The second method I tried was found online. First an adjustment layer is created over the image, in this case I used a levels adjustment to increase the black. After that, a mask is put on the adjustment layer and filled in so that only some of the darkened effect is shown.

I then experimented around with the channels of the original image, trying to find a different way to do it. I duplicated the black channel and erased all the parts which I did not want, leaving only the left side of the face. I used command-click to make a selection, and copied that black in to enhance the shadows. This looks a lot like the second method, but it also exaggerated the texture on the face and made the skin look more rough.
I actually just ended up using the simpler method, as I felt the outcome looked better. The techniques were still good to pick up though, and the layer masking techniques were applied in other aspects.

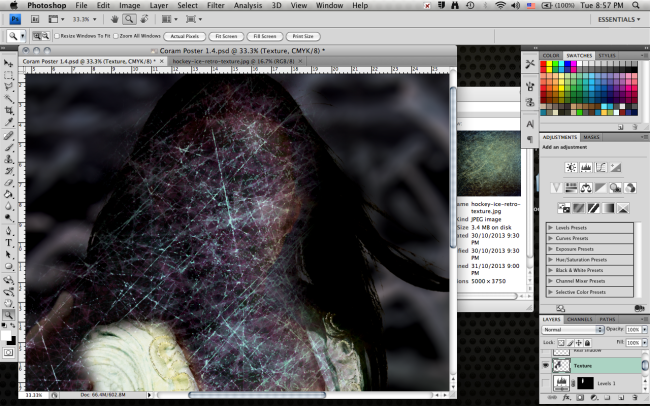
Another thing I was asked to do by the client was apply a layer of texture onto the image to make it look weathered. The texture did not have to look realistic, and was more of a stylistic choice.
I honestly had no idea how to do this. I first thought to maybe use the channel selections like before, but that did not work at all, so once again I looked to the internet for answers.
http://www.youtube.com/watch?v=GjjagNn_sMA
http://layersmagazine.com/adding-texture-to-photographs-in-photoshop.html
http://www.photoshopessentials.com/photo-effects/blend-textures-with-photos/
http://www.slrlounge.com/post-production-how-to-apply-textures-to-images-using-photoshop
Through these tutorials I learned to use layer blending modes, which I was not aware of before. I applied the technique, putting the layer on top and going through the layer modes to find a good one.

I was still a bit unsure of the meanings of different blending modes, so I found a video explaining them in more detail: http://www.youtube.com/watch?v=mibCkK1nDpI
After applying the effect, I then added layers of color gradients and shadows to the background to add to the atmosphere of the image and used adjustment layers to alter the brightness, saturation etc. I also added text.

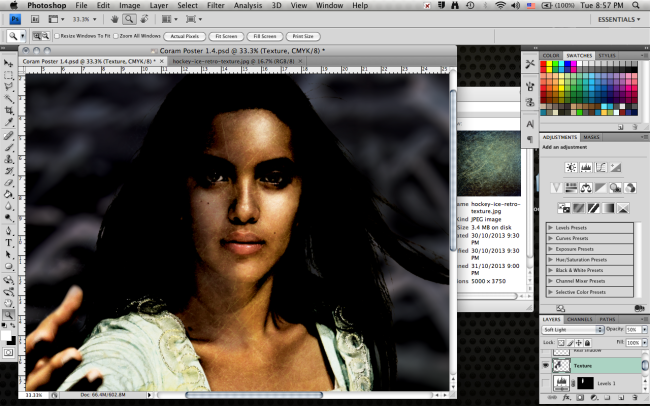
Speaking with the client, I was advised to further blend the 3 parts of the image, the foreground, background and text. I was also told to change the font. I spoke with someone with experience with photoshop and creating posters, and she told me to use the layer blending modes on the text to create a better blend. She also told me to blend the foreground and background with a sort of smoke effect and taught me a technique to create smoke.
The text was blended using the overlay mode, but it was too transparent so I duplicated the layer until it was the right opacity.

The smoke cloud technique:
Use the brush to paint a few areas white. Use the liquefy tool to smudge some of the areas and create a tendril-like look to the clouds. Click edit > fade liquefy. Repeat process until satisfied.


I used the smoke technique, as well as downloaded smoke brushes to create smoke/ fog around the foreground image. Another technique that I used to blend the image was layer masks. I put a mask over the image such that all of it was visible. Then I used the smoky brushes as well as some general low-opacity brushes to draw on the areas around the edges the hair and dress, making them invisible. This effectively made it look like smoke was eating away at the image of the person.
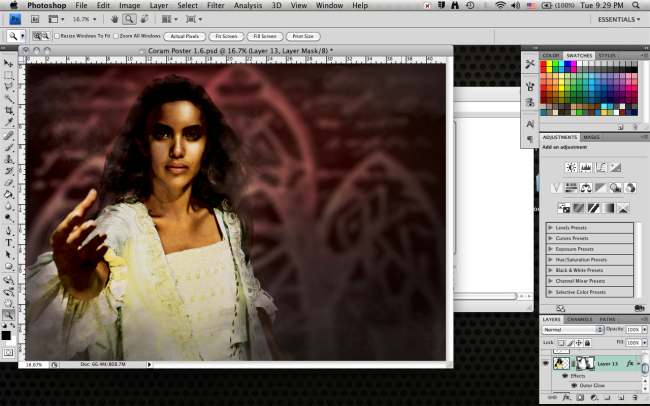
The final poster:

Overall, I did not particularly like the outcome of this poster. In terms of fulfilling the purpose, it was okay, as all of the things done were to the specifications of the client. However, I think it might have turned out better if I had brainstormed some ideas of my own and pitched them instead of just launching straight into the project. It could have definitely used more planning, and that would probably have resulted in something more aesthetically pleasing.